Key actions
When tying knots, being tidy and precise helps to eliminate failure under load. When we "Dress" a knot, we are striving to make the knot very recognizable and leaving just the right amount of tail ends. If you leave your tail/s too short, the knot may slip and come undone. Dressing the knot also includes removing the slack in the knot. To "set" a knot, we simply tighten the knot by pulling on all ends. This forms a good quality control check before you really need to rely on that knot. Take some care in tightening the knot to maintain its proper form. Sometimes it advantageous to leave a little extra running end after the knot (tail). You can then tie a "Backing Knot" like a simple over-hand knot after your primary knot. If the primary knot slips a bit, the backing knot will often prevent complete failure.
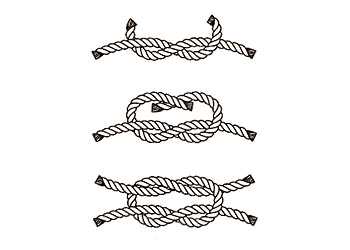
Example of Backing KnotsHere is a good example of backing knots:

Terminology
A major challenge for some in learning to tie knots is the terminology. For our purposes, we will only concentrate on a few special words:
- Standing End - This portion of the rope (or line) is the long side. It carries the load of the object you may be hauling or dragging.
- Running End - This is end of the rope where you are actually tying the knot.
- Bight - Usually the middle of the rope. We sometimes tie a knot in the "bight" or middle of the rope when we don't have access to either end of the rope.
- Loop - A loop is a circle of rope in which a rope crosses itself.
Here is a more comprehensive article on knot terminology: Knot Terminology.
Figure 8 knot and figure 8 on a bight
There are several knots you can choose from to create a loop. Two common ones are the bowline and the Figure 8 on a bight. In rescue and climbing tasks, we want maximum strength, ease in tying and untying, and of course simplicity. Under numerous tests, the Figure 8 knot is always stronger than the bowline (check out this knot strength article). The Figure 8 is also easy to identify when you have tied it correctly. Finally, the bowline can be very difficult to untie after significant load has been placed on the standing end. The basic Figure 8 can be used to make a loop, form a stopper knot, and prevent frayed ends of ropes from unraveling. It is no wonder this knot is the first choice for professional rescue personnel and climbers. Here are some variations with demonstrations:
- The Basic Figure 8
- Figure 8 on a Bight This no more than bending the rope and simply tieing a basic figure 8 knot
Components of a good knot
 Let's take the Square Knot as an example. Notice the symmetry of this knot. It is very easy recognize if it is tied correctly.
 The Granny Knot Now lets compare this properly tied knot to the Granny Knot which is the most common way to incorrectly tie the Square Knot.
The Square Knot is much stronger than the Granny Knot and is much easier to untie when no longer needed. Both of these traits are exactly what we desire in a great knot.
Some other characteristics of great knots are the ease in tying, a great example is the simple and very versatile Figure Eight Knot. Often, we are interested in reliable knots that are also easy to untie when we are finished. A tensionless hitch is a good example. Minimal rope use can be desirable as well. The water knot used to tie webbing is very concise and works exceptionally well.
The following article from a caving organization provides some great evidence on rope strength and why proper tying of knots is so crucial: Article on Rope/Knot Strength. Good takeaways from this article are:
- Proper knot selection often means the difference between 50% strength loss versus 20%
- Improperly tied knots fail prematurely under load
- Backing knots are very important when your line is under load
- The old rule of thumb, 50% strength loss isn't a bad rule of thumb for us to use for maximum load estimations
Page 3 of 4
- You are here:
-
Home

- Knots Training Material